Our Home-made
Outbuildings
For work space and storage
by Tom Roberts, 1-Jan-10
Click on photos to enlarge.
On this page: Outdoor Potting Shed • Barn One • Barn TwoShelf Greenhouse • Veg Wash & Prep Area
Also see these pages: Our Cooler • the Remay Shed • Building Techniques.
|
|
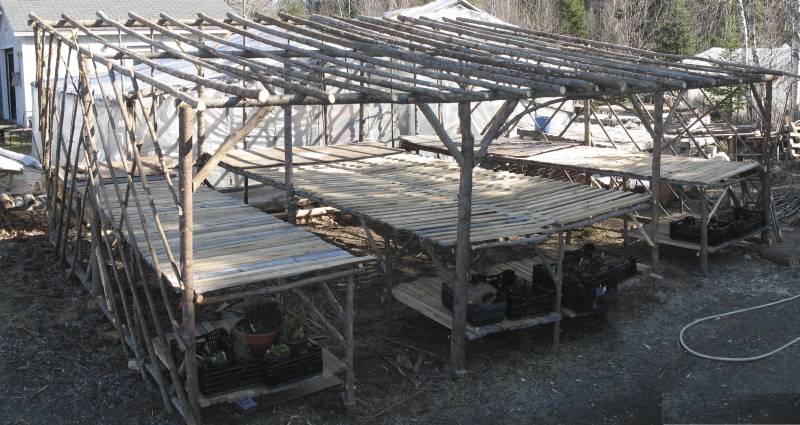
Outdoor Potting Shed.
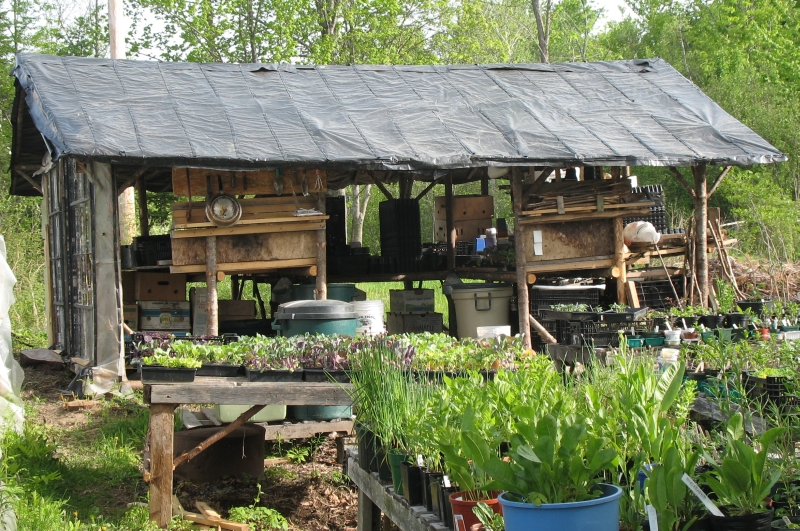 Built in April, 2009. When it gets just too hot in the greenhouse to do the work of starting seeds and planting and transplanting seedlings and perennials, we can now move out to the Outdoor Potting Shed. Our original attempt to move outside was a simple table with shelves nearby the washing area, but that proved too small for easy working and too close to all the other activity going on in the washing area, so we decided to build a much larger covered outdoor potting area away from the washing area, and to include significant pot and potting soil storage. Built in April, 2009. When it gets just too hot in the greenhouse to do the work of starting seeds and planting and transplanting seedlings and perennials, we can now move out to the Outdoor Potting Shed. Our original attempt to move outside was a simple table with shelves nearby the washing area, but that proved too small for easy working and too close to all the other activity going on in the washing area, so we decided to build a much larger covered outdoor potting area away from the washing area, and to include significant pot and potting soil storage.
 The design of the new building consists of a central floor space surrounded on three sides by a wrap-around potting table. Surrounding that are three tiers of shelving accessible from the potting area or from the outside. The only “wall” is made of two large 5’x5′ recycled storm windows that block the wind from the windiest side. The roof is made of recycled black pool-cover plastic stapled to spruce pole rafters, and it overhangs the sides by about 18 inches. We decided to go with an opaque roof to provide shade inside, since we planned to use the shed during the hottest parts of the year. The design of the new building consists of a central floor space surrounded on three sides by a wrap-around potting table. Surrounding that are three tiers of shelving accessible from the potting area or from the outside. The only “wall” is made of two large 5’x5′ recycled storm windows that block the wind from the windiest side. The roof is made of recycled black pool-cover plastic stapled to spruce pole rafters, and it overhangs the sides by about 18 inches. We decided to go with an opaque roof to provide shade inside, since we planned to use the shed during the hottest parts of the year.
 All the shelving is made from 2 inch wide one inch thick cedar slats, seconds purchased from a picket fence company in town. We were able to consolidate most of our pots and planting and watering trays into this area, and we use stacks of black plastic crates for storage of the smaller loose items. All the shelving is made from 2 inch wide one inch thick cedar slats, seconds purchased from a picket fence company in town. We were able to consolidate most of our pots and planting and watering trays into this area, and we use stacks of black plastic crates for storage of the smaller loose items.
The shed itself is handily located next to our outdoor plant tables, so trays and pots can be placed on the tables in only a few steps. |
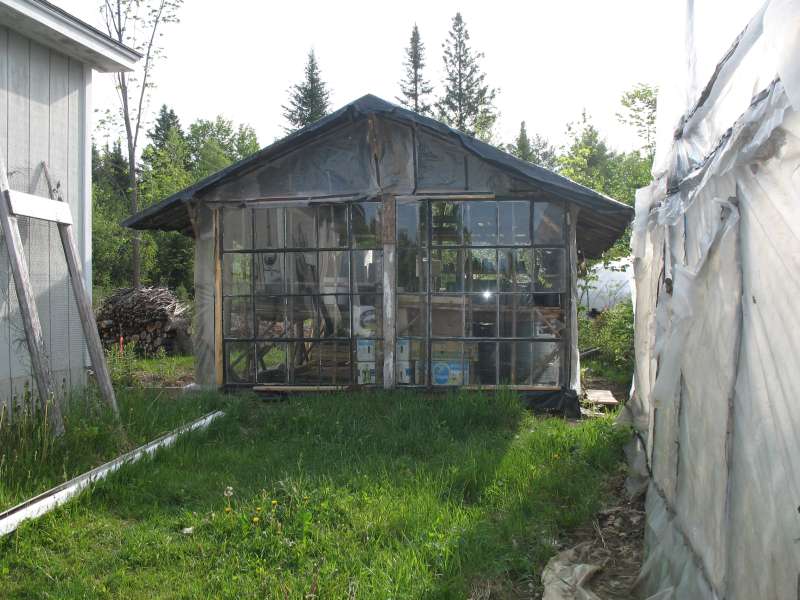
Shelf Greenhouse.
 Built in May 2009. We built our original shelf greenhouse in the spring of 2001 (top photo) entirely out of spruce poles with popple saplings for the shelving. (Notice the roll-up front, a feature we also incorporated into the new Shelf Greenhouse.) It worked fairly well for almost ten years, proving the concept was a good one. But eventually the popple shelving started to rot and the uneven shelf surfaces and inconvenient support poles made us decide to tear it down and start over. So in the fall of 2008 Coco took hammer and wrecking bar and reduced the old shelf greenhouse to stacks of kindling wood. Built in May 2009. We built our original shelf greenhouse in the spring of 2001 (top photo) entirely out of spruce poles with popple saplings for the shelving. (Notice the roll-up front, a feature we also incorporated into the new Shelf Greenhouse.) It worked fairly well for almost ten years, proving the concept was a good one. But eventually the popple shelving started to rot and the uneven shelf surfaces and inconvenient support poles made us decide to tear it down and start over. So in the fall of 2008 Coco took hammer and wrecking bar and reduced the old shelf greenhouse to stacks of kindling wood.
 Since the concept proved very useful, we decided to build another shelf greenhouse on the same location, but this time with many improvements. Here is a photo before the plastic went on the sides and roof. The shelves are made from the same cedar slats as the shelves in the Outdoor Potting Shed. Since the concept proved very useful, we decided to build another shelf greenhouse on the same location, but this time with many improvements. Here is a photo before the plastic went on the sides and roof. The shelves are made from the same cedar slats as the shelves in the Outdoor Potting Shed.
The original purpose of the Shelf Greenhouse was to have a place to bring seedlings out of the heated greenhouse without placing them immediately outside. In other words, it plays the role of a hardening-off “half-way house” between the heated greenhouse and the outdoors. During the season one crop of seedlings after another comes out of the heated greenhouse and into the Shelf Greenhouse for a few days or a week before being set on tables outside, eventually to be planted in the field or sold at the farmers’ markets. This meant that the design of the Shelf Greenhouse had to make it easy to transport trays in and out, since we’d be doing it so often. The two aisles allow workers to easily carry trays in and out, and the shelves were designed to hold the maximum number of trays most efficiently. We also laid recycled landscape fabric on the floor to keep weeds from growing, which was a problem in the previous design. The Shelf Greenhouse gets used this way from early May’s broccoli until mid June’s melons.
Once it was built, we discovered that it would be also useful for curing late summer onions and squash, and the fact that it could be closed up on cold nights by rolling down the front was a bonus. The only alteration we made for this use to the original design was to add a complete layer of bottom shelves and vents on both sides in the top back. |
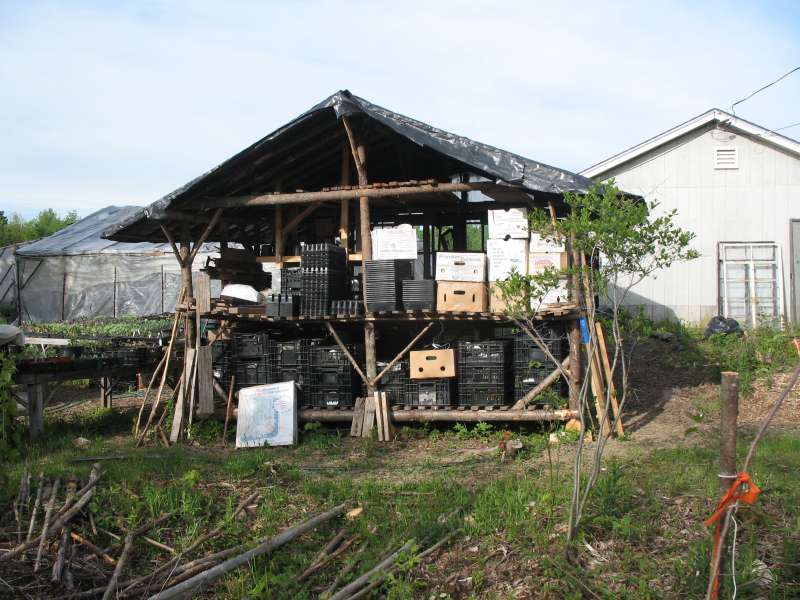
 Barn One. Barn One.
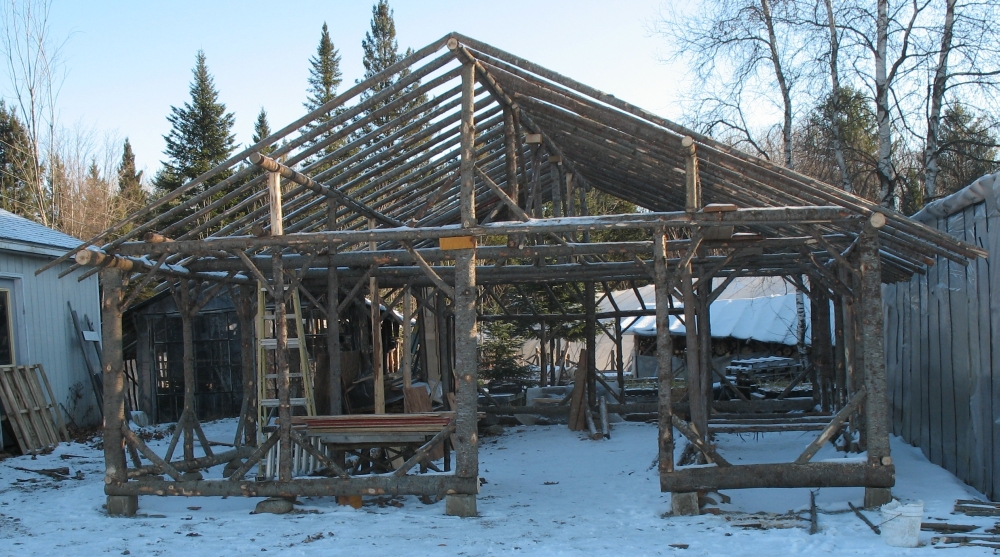
Built in December 2009. For years we’ve been talking about building a barn, a large structure (by our standards) where we could park the tractor, dry garlic, and store a large amount of stuff. In the spring of 2009, we cut a large number of spruce poles near the future barn site and below the Blackberry Garden. By late fall, these had dried sufficiently to begin. Elmer Faloon, who had been working at the farm part time since June continued to come by on Saturdays to help with construction.
The location had recently been a large rock dump, likely made by those pioneers who had years ago cleared the fields of stones, and we ourselves had in the past few years hauled most of them away to fill in ruts in woods trails and to make a culvert so we could travel into the lower fields during the wet season. All that were left were a considerable number of large “two-person” rocks which we rolled into position to support two sills made of the largest trees we could wrestle into position. Upon these we erected twelve verticals and atop those put a second set of sills for the second floor. The process was repeated for the second floor. Corner braces were installed as we went at every opportunity. We tied the poles together using six-inch pole barn nails, and twenty- and sixteen-penny nails on the smaller wood. Where we had to install top braces, we used 3½” and 4″ torx screws. The roof rafters were forty of the straightest 11 foot spruce poles we could find, often having to stop work to cut a few more trees for just the poles we needed. |
Barn Two.
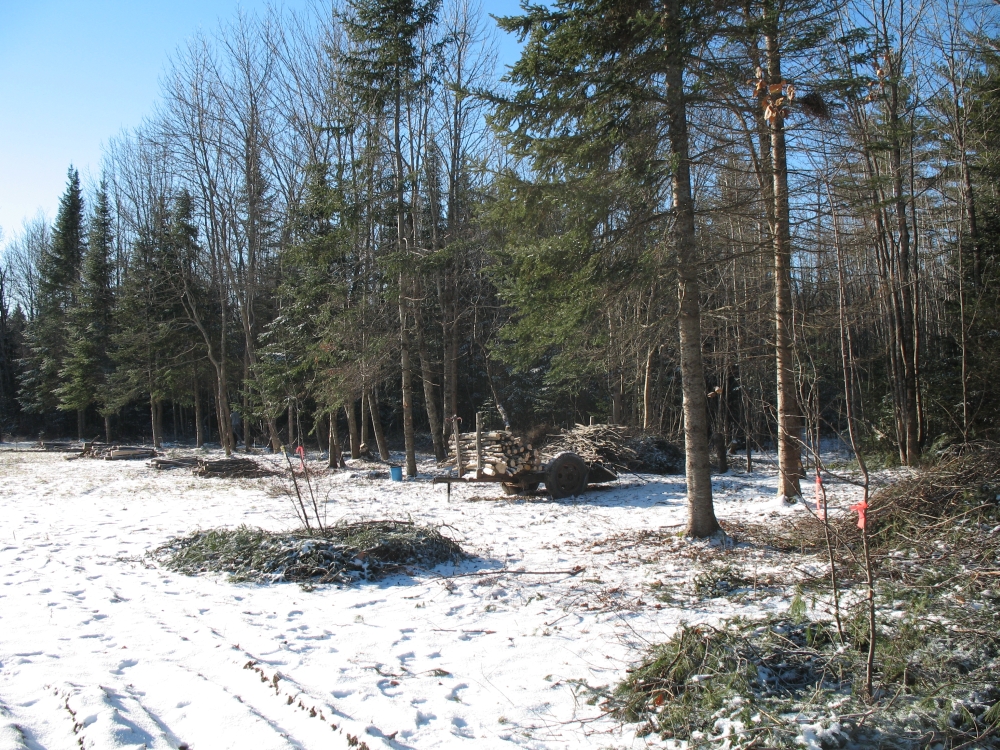 To reduce late day shading of the Southwest Garden, Tom and the farm crew (Mike, Jason, Elmer and Dan) thinned the nearby woods for firewood & barn poles. This should add as many as two hours of sunlight to that garden. This heavy thinning of an 800 ft. x 100 ft. section of woods provided us with several cords of firewood and all of the poles needed for the framing of our new barn. The poles intended for the barn we hauled to a place near the construction site and sorted them as they arrived according to their likely use: sills, ridge poles, verticals, rafters and bracing. To reduce late day shading of the Southwest Garden, Tom and the farm crew (Mike, Jason, Elmer and Dan) thinned the nearby woods for firewood & barn poles. This should add as many as two hours of sunlight to that garden. This heavy thinning of an 800 ft. x 100 ft. section of woods provided us with several cords of firewood and all of the poles needed for the framing of our new barn. The poles intended for the barn we hauled to a place near the construction site and sorted them as they arrived according to their likely use: sills, ridge poles, verticals, rafters and bracing.
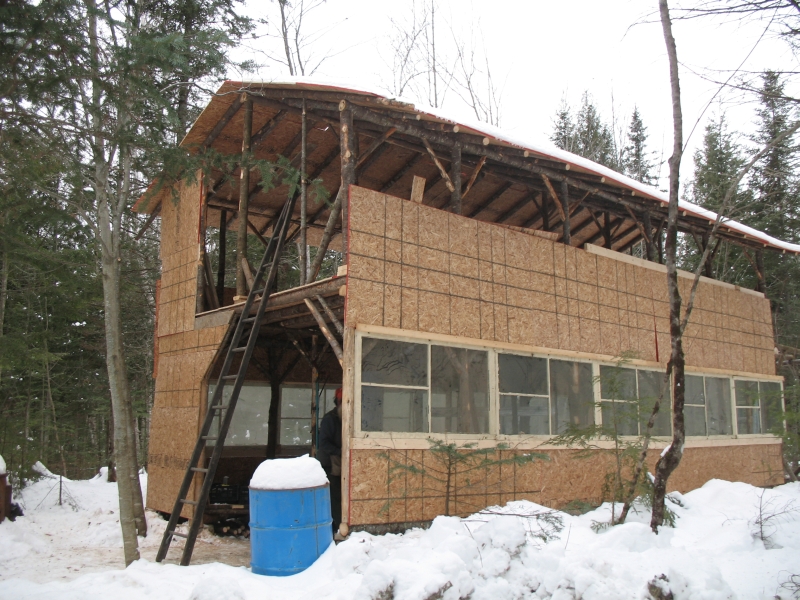
 Starting in mid-November, we tore down Greenhouse #2 to erect a 30 ft. x 22 ft. barn. GH2 was always our least productive greenhouse due to being situated in a shady area. When we tore it down, we recycled many of its poles, moved its topsoil to a large pile nearby, and leveled the area with gravel. Then we positioned concrete blocks and flat rocks to lay the sills on. Within a week, the frame was in place and ready for the OSB (chip board) covering for the sides and roof. The sides were covered with cedar shingles made in nearby East Newport and the roof covered with asphalt shingles from Hancock Lumber in town. Recycled storm windows allow light in along the top 30 inches on the two longest sides. Starting in mid-November, we tore down Greenhouse #2 to erect a 30 ft. x 22 ft. barn. GH2 was always our least productive greenhouse due to being situated in a shady area. When we tore it down, we recycled many of its poles, moved its topsoil to a large pile nearby, and leveled the area with gravel. Then we positioned concrete blocks and flat rocks to lay the sills on. Within a week, the frame was in place and ready for the OSB (chip board) covering for the sides and roof. The sides were covered with cedar shingles made in nearby East Newport and the roof covered with asphalt shingles from Hancock Lumber in town. Recycled storm windows allow light in along the top 30 inches on the two longest sides.
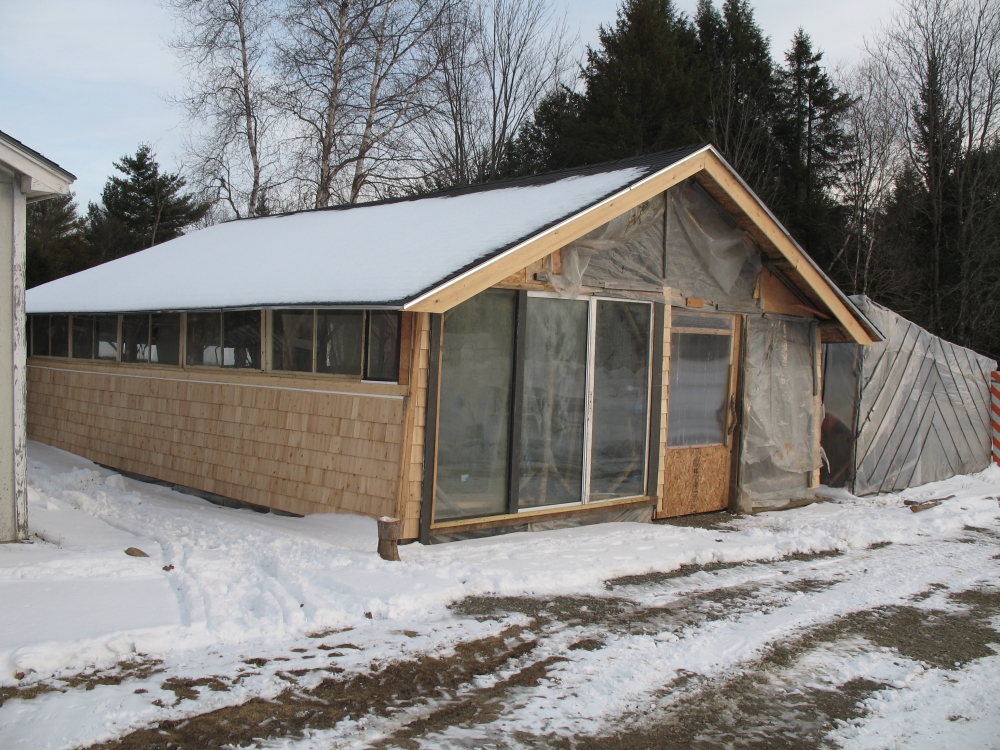 The new barn will be used to store and clean onions and garlic, sort tomatoes, cure and store winter squash, etc. It is in an area located close to the Vegetable Washing & Prep Area where the crops will be more accessible for loading the market trucks. It will provide crop and worker protection in inclement weather, has better ventilation, is drier, and is in a sunnier location than our previous alium storage areas. The new barn will be used to store and clean onions and garlic, sort tomatoes, cure and store winter squash, etc. It is in an area located close to the Vegetable Washing & Prep Area where the crops will be more accessible for loading the market trucks. It will provide crop and worker protection in inclement weather, has better ventilation, is drier, and is in a sunnier location than our previous alium storage areas.
|
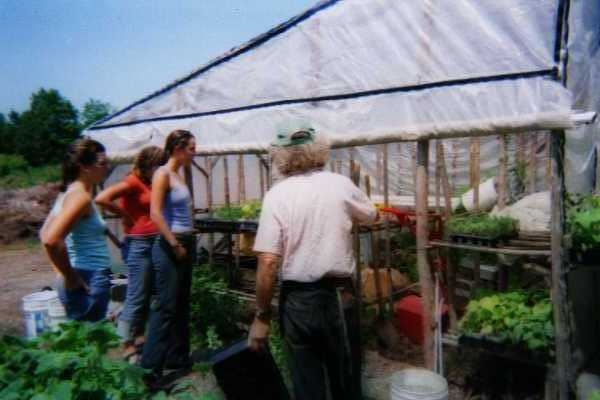
 Veg Washing & Prep Area. Veg Washing & Prep Area.
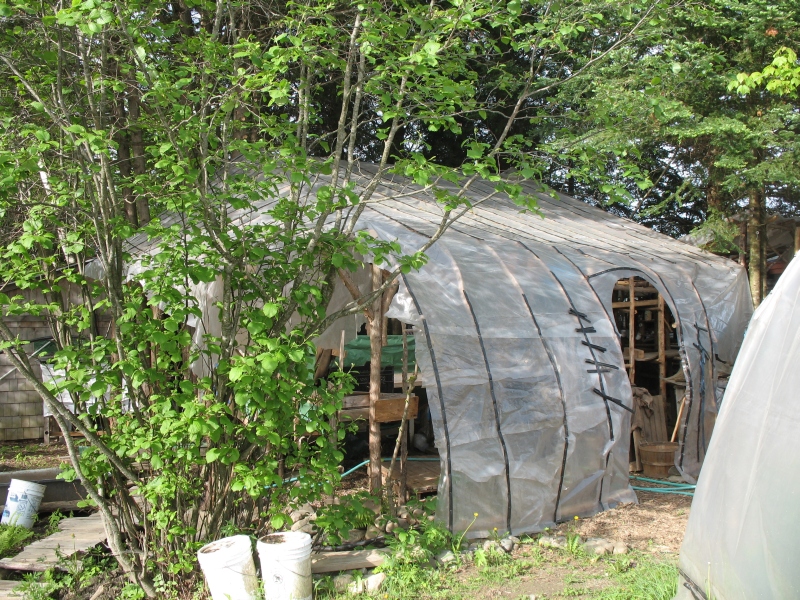
Built in 1997, rebuilt 2009. When we began attending farmers’ markets from this farm in 1997, we needed to find an organized central location where we could wash and prep veggies for market. We chose an area in a grove of cedars and spruces near the top of our fields which would provide us with shade and be right next to where we park our market vehicles.
The basic structure is a spruce and cedar pole frame nestled among the trees and covered with used greenhouse plastic. There are no sides, and it is completely in the shade for most of the day, even when the deciduous trees have no leaves.
Our Washing Area is equipped with two hoses coming from our two wells, two washing stations with spray curtains, shaded storage for incoming veggies, and is next to our 8’x8′ walk-in cooler and the packing supplies storage shed. There is room for a cart to be loaded and two pallets for stacking wooden boxes under cover to be used for the veggies.
The April 2009 expansion heightened the roof, expanded the width, covered the second washing station and added sufficient shelving for baskets and tubs used for harvesting. Each washing station directs the used wash water into a bathtub outside, where in the dry season the water can be pumped into barrels where it is then siphoned onto the gardens. If the used wash water is not needed, the bathtub just overflows into the cedar grove behind the Washing Area.
More information about washing and prepping veggies for market can be found at our page Prepping Veggies for Market. |

