We use drip-via-gravity as well as drip-via-well-pressure, and both work great. We irrigate about an acre and a half each year, including six greenhouses. Most of what we water is done with well water, although we are trying to move toward more gravity fed, as our well capacity is often strained, and because it costs nothing to pump gravity fed water. There were several weeks last July when we had two wells and the spring all watering different sections of our gardens at once. We do no overhead watering, except on seedlings in the greenhouse.
Our gravity fed system works either from the spring 1000 feet back in the woods or from rain barrels siphoned together to make a single reservoir. Because of the layout of our land, only some of the gardens are capable of being gravity fed. But the amount of garden that is low enough to water this way is greater than the capacity of the gravity system to keep it watered.
We have found that mulches reduce the need for adding water, among many other benefits. Garlic, which is mulched in November, retains considerable moisture under the mulch into late July, when harvesting begins. Our rhubarb, which is perennially mulched with a thick layer of leaves, also requires no summer watering. Celery, which can’t get enough water, is both mulched and watered with drip tape. Tomatoes, also mulched with a thick layer of leaves, only needs watering in August as fruits are developing.
What follows assumes the reader knows next to nothing about drip irrigation systems. Although the focus is on low-pressure gravity fed water, we also mention the alterations we use to accommodate a well-pressure system (40-60 psi); the same tape can be used for either. Springs dry up and rain barrels empty out—it’s nice to know how you can switch over to pressured water if you need to, using essentially the same system.
DRIP TAPE BASICS
Since drip tape is designed to work on 7-12 lbs. pressure, you usually won’t need a pressure reducer with gravity feed, but you will need a filter, as the tiny holes in the drip tape will get clogged with silt and debris very easily. Filters are recommended even on well water systems. Generally there is one hole (“drip emitter”) per foot, but you can get it with emitters at almost any spacing. Most usually the emitters drip at the rate of ½ gal. per hour; and they stay on around six to eight hours, then another area is watered. Each drip tape stays in place as long as the crop is growing. Thus the length of tape you need approximately equals the sum of the lengths of all the rows you want to water. Two exceptions: Two closely spaced rows can use one drip tape down the center; and succession cropping may mean removing the tape after one crop is done, tilling, and replacing the same tape again for the next crop. See discussion below on rows per bed under IF YOU HAVE ENOUGH WATER FLOW.
HOW MUCH PRESSURE DO I HAVE?
To figure your pressure, a rule of thumb is ½ lb. of water pressure for every 1 foot of head (the vertical fall the water makes while getting from source to point of usage in a closed system). To be exact, atmospheric pressure (14.7 lbs. per sq. in.) will support a column of water 34 feet high; so 14.7 lbs. per sq. in = 34 feet of water, or roughly ½ lb. of pressure per foot of drop. Like I said it’s a rule of thumb. Drip won’t work with 3 lbs of pressure, so do the math for your site. Most of our gardens are 15 to 20 feet below the bottom of the barrels feeding them, so we have 7 to 10 lbs of pressure, enough for the drip tape.
SOURCES
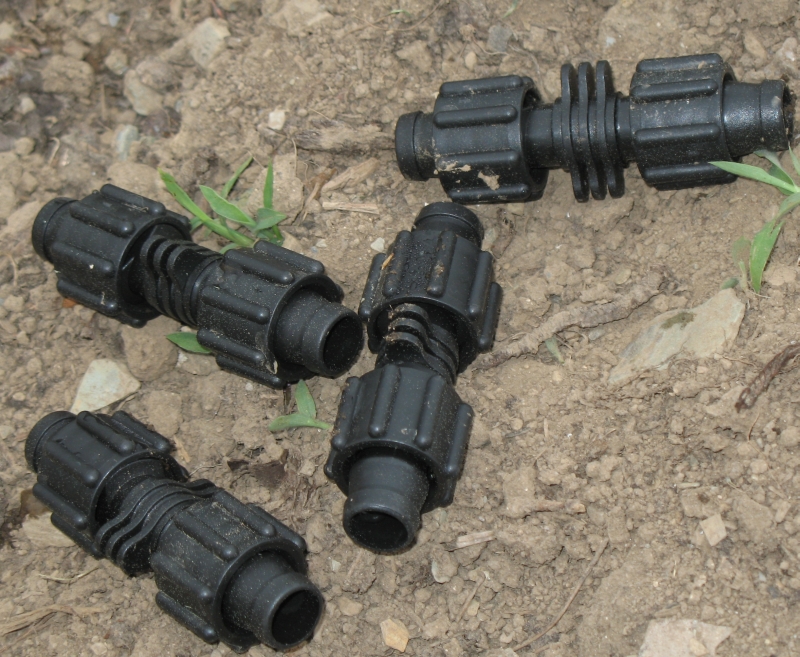 We use Charles W. Harris in Massachusetts for all our irrigation supplies. They are quick and courteous, and don’t treat my like an idiot when I ask very basic questions, which I did, especially in the beginning. On Monday I ordered some header pipe and a package of 100 coupling to repair holes in drip tape, and they arrived UPS today (Tuesday). Jim Pooler is the sales rep, and his toll free number is 1-888-water31. They set up at the Ag Trades Show in Augusta every January, which is where I found them originally. Organic Growers Supply in Clinton (part of Fedco Seeds) has also begun carrying drip irrigation equipment, as does Griffin Greenhouse Supply in Gray, and there are dozens of others. Find someone who will get you the parts quickly when you call in a mid-summer panic. Just be sure you aren’t buying at gardener’s prices to water a farm. We use Charles W. Harris in Massachusetts for all our irrigation supplies. They are quick and courteous, and don’t treat my like an idiot when I ask very basic questions, which I did, especially in the beginning. On Monday I ordered some header pipe and a package of 100 coupling to repair holes in drip tape, and they arrived UPS today (Tuesday). Jim Pooler is the sales rep, and his toll free number is 1-888-water31. They set up at the Ag Trades Show in Augusta every January, which is where I found them originally. Organic Growers Supply in Clinton (part of Fedco Seeds) has also begun carrying drip irrigation equipment, as does Griffin Greenhouse Supply in Gray, and there are dozens of others. Find someone who will get you the parts quickly when you call in a mid-summer panic. Just be sure you aren’t buying at gardener’s prices to water a farm.
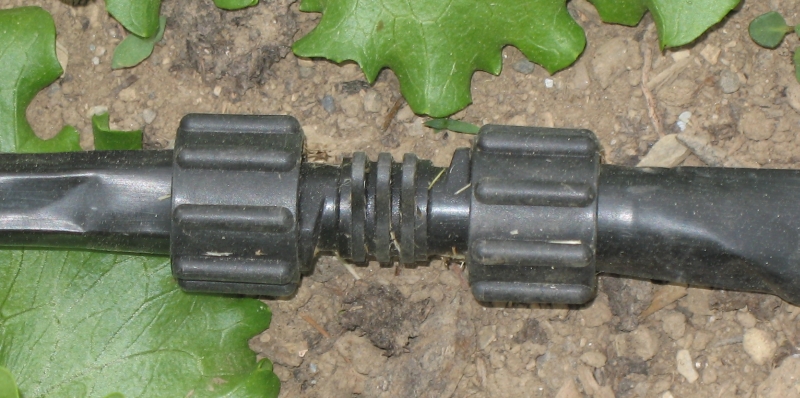 If you are planning on using the drip tape more than one year, get the heavy duty stuff, 15 mil, I think it is. It’s a little more money than the medium and the light weight types, but it’s ability to withstand abuse is far superior, it is easier to handle and work with, and it doesn’t blow off the beds as easily. Brand does not seem especially important; there are a dozen or more, but all are mutually compatible, parts-wise. The tape comes in a roll of about 3000 or 4500 feet (depending on tape thickness). Get a roll, what you don’t use will keep, and you WILL eventually be replacing the tape you use. You can also get re-usable couplings for about 70 cents apiece that allow you to professionally and “permanently” splice two lengths of tape together. You can go on the cheap by using 4 inch pieces of ½ inch vinyl garden hose, each end cut at 45 degrees so it inserts into the tape more easily. If they leak, use wire potato bag ties around the tape to tighten it, and also to keep it from pulling apart when you move the tape at the end of the season. Although this works, I have abandoned this home-made splicing system in favor of the couplers; I have 250 of them now and they can be re-used indefinitely. All summer I keep two or three in my pocket, so that, with my pocket knife, I can quickly make any repairs to the tape that I discover. If you are planning on using the drip tape more than one year, get the heavy duty stuff, 15 mil, I think it is. It’s a little more money than the medium and the light weight types, but it’s ability to withstand abuse is far superior, it is easier to handle and work with, and it doesn’t blow off the beds as easily. Brand does not seem especially important; there are a dozen or more, but all are mutually compatible, parts-wise. The tape comes in a roll of about 3000 or 4500 feet (depending on tape thickness). Get a roll, what you don’t use will keep, and you WILL eventually be replacing the tape you use. You can also get re-usable couplings for about 70 cents apiece that allow you to professionally and “permanently” splice two lengths of tape together. You can go on the cheap by using 4 inch pieces of ½ inch vinyl garden hose, each end cut at 45 degrees so it inserts into the tape more easily. If they leak, use wire potato bag ties around the tape to tighten it, and also to keep it from pulling apart when you move the tape at the end of the season. Although this works, I have abandoned this home-made splicing system in favor of the couplers; I have 250 of them now and they can be re-used indefinitely. All summer I keep two or three in my pocket, so that, with my pocket knife, I can quickly make any repairs to the tape that I discover.
THE FILTER
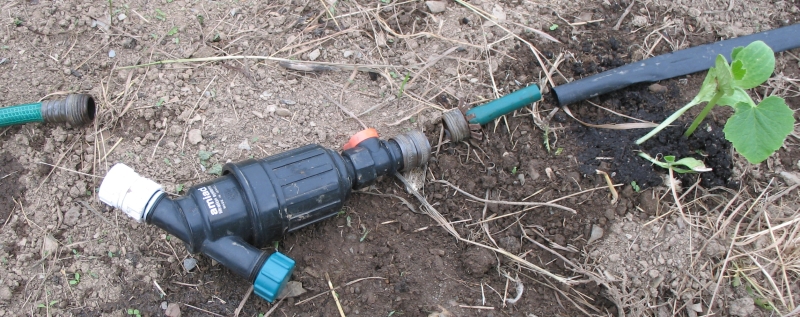 In any case you’ll need a filter. Don’t jerry-rig one, spend the bucks and get a real one made for this purpose. Even well water needs a filter, and besides, the hoses you use to get to the gardens will get dirt in them from time to time. I have my filter set up so that it has female hose fittings on both ends; the incoming water hose enters input side of the filter and the output side screws onto the male fitting on the header pipe (if you have a lot of water volume available) or a single drip tape feeder hose (if you have little water available). That way I can’t mistakenly connect the hose to the header or the hose feeders without the filter in place (or filter & pressure reducer when using high pressure water sources). A regular hose shut-off valve after the filter comes in very handy, as it allows me to turn the water off when I move from one set-up to another. In any case you’ll need a filter. Don’t jerry-rig one, spend the bucks and get a real one made for this purpose. Even well water needs a filter, and besides, the hoses you use to get to the gardens will get dirt in them from time to time. I have my filter set up so that it has female hose fittings on both ends; the incoming water hose enters input side of the filter and the output side screws onto the male fitting on the header pipe (if you have a lot of water volume available) or a single drip tape feeder hose (if you have little water available). That way I can’t mistakenly connect the hose to the header or the hose feeders without the filter in place (or filter & pressure reducer when using high pressure water sources). A regular hose shut-off valve after the filter comes in very handy, as it allows me to turn the water off when I move from one set-up to another.
IF YOU HAVE ENOUGH WATER FLOW
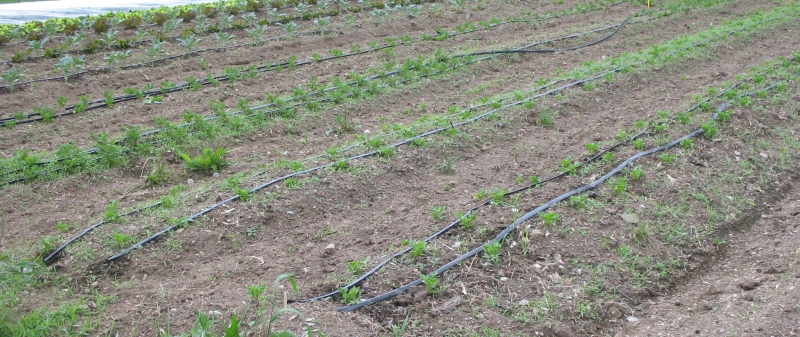
![When feeding more than one tape, a header pipe is used. Each tape is plugged into the header pipe, then the header is presurized using a filter [and pressure reducer if watering with well pressure]. Hose caps are used to prevent dirt from getting into the headers when not in use. (Click to enlarge.)](/farm/wp-content/uploads/HeaderEnd_800.jpg) Once you have a bunch of rows done, they are attached to a header. The header is similar to one inch black plastic pipe, but with a slightly thinner wall. It allows you to easily distribute water to many tapes at once. With a special punch tool designed for this purpose, I poke a hole in the header where my row is, pop a barbed outlet fitting into the hole, then slip the drip tape over the outlet fitting and screw it on tight. The punch tool, barbed outlet fittings and header pipe are all available from any good drip irrigation supply house. You do NOT want to use regular black plastic pipe, as it won’t take the barbed outlet fittings, even if you manage to punch a hole in it. Besides, header pipe is considerably less expensive, yet will take 100 psi. It comes in 400 foot roles. Once you have a bunch of rows done, they are attached to a header. The header is similar to one inch black plastic pipe, but with a slightly thinner wall. It allows you to easily distribute water to many tapes at once. With a special punch tool designed for this purpose, I poke a hole in the header where my row is, pop a barbed outlet fitting into the hole, then slip the drip tape over the outlet fitting and screw it on tight. The punch tool, barbed outlet fittings and header pipe are all available from any good drip irrigation supply house. You do NOT want to use regular black plastic pipe, as it won’t take the barbed outlet fittings, even if you manage to punch a hole in it. Besides, header pipe is considerably less expensive, yet will take 100 psi. It comes in 400 foot roles.
LAYING OUT THE TAPE
 I mount the roll on a garden cart with a metal rod through the center of the spool, then grab one end of the tape and walk to the far end of the row. Once there I cut off a one inch piece, fold over the end twice, and slip the one inch piece over the folds to keep it folded. That’s how you end your tape on each row. Then I walk back to the roll on the cart, and cut the tape at the top of the row, reposition the cart at the next row, and repeat. The tape cuts easily with a pocket knife. Always make your cuts square, not angled, or they won’t fit snugly on the fittings and will thus leak. I mount the roll on a garden cart with a metal rod through the center of the spool, then grab one end of the tape and walk to the far end of the row. Once there I cut off a one inch piece, fold over the end twice, and slip the one inch piece over the folds to keep it folded. That’s how you end your tape on each row. Then I walk back to the roll on the cart, and cut the tape at the top of the row, reposition the cart at the next row, and repeat. The tape cuts easily with a pocket knife. Always make your cuts square, not angled, or they won’t fit snugly on the fittings and will thus leak.
When you are setting out your tape, just lay it in the aisle, don’t try to position it around the plants just yet. Once a section is laid out and attached at the top (or pinned down using floating row cover staples if you aren’t ready to connect it yet), start at the top and move the tape onto the crop. This can generally be done at a fast walking pace, even when you are positioning two tapes at once on a bed. If you are laying tape on existing transplants, on single rows try to keep the tape on the windward side of a row or to snake it back and forth from one side of the row to the other, to keep the wind from moving it. Dealing with drip tape involves a lot of walking—get used to it.
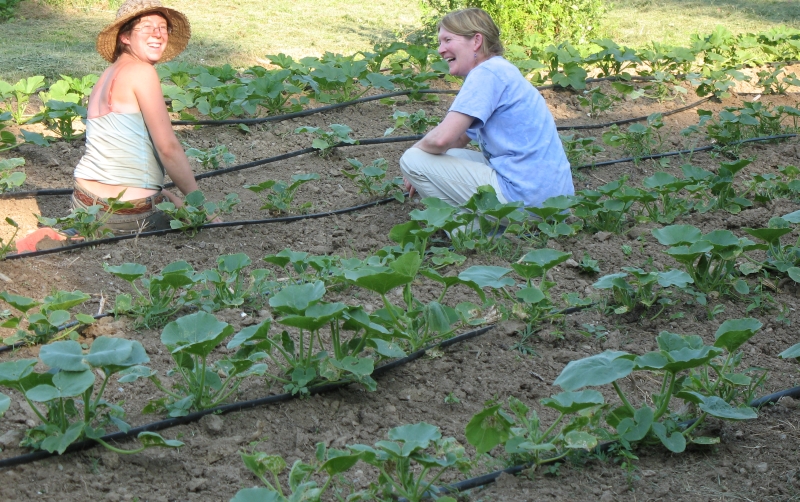 If your rows are 5 feet apart, your barbed inserts on your header will be 5 feet apart. If you have three or four rows on a bed, lay drip on both sides of the middle row(s), or between rows 1 & 2 and between rows 3 & 4. Now you will need two barbed fittings per bed, about 18 inches apart, to feed these two tapes. Any emitters in the header that aren’t being used can be blocked with a piece of drip tape only eight inches long, with a folded end just like your long tapes. Thus a section of header pipe with two barbed fittings every five feet can be used on beds having one, two, three, or four rows per bed, simply by blocking off every other fitting when you only need one tape per bed. If your rows are 5 feet apart, your barbed inserts on your header will be 5 feet apart. If you have three or four rows on a bed, lay drip on both sides of the middle row(s), or between rows 1 & 2 and between rows 3 & 4. Now you will need two barbed fittings per bed, about 18 inches apart, to feed these two tapes. Any emitters in the header that aren’t being used can be blocked with a piece of drip tape only eight inches long, with a folded end just like your long tapes. Thus a section of header pipe with two barbed fittings every five feet can be used on beds having one, two, three, or four rows per bed, simply by blocking off every other fitting when you only need one tape per bed.
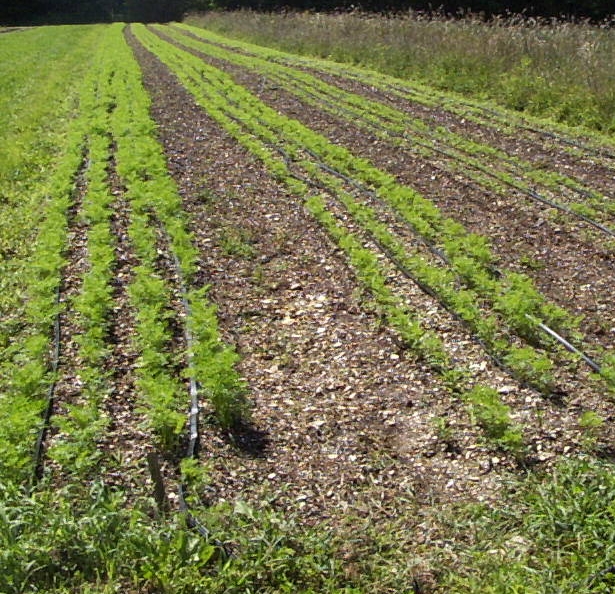 You can make one header and move it around, but your rows won’t exactly match up with the outlets you’ve made for other rows unless your garden is laid out with great accuracy. We have about eight headers that handle two 250-foot beds each (because that’s how much our well can handle), and move them about only when necessary. You can make one header and move it around, but your rows won’t exactly match up with the outlets you’ve made for other rows unless your garden is laid out with great accuracy. We have about eight headers that handle two 250-foot beds each (because that’s how much our well can handle), and move them about only when necessary.
Where the water enters the header, I have a plastic hose-thread nipple held tight with a standard metal hose clamp (both from Jim) which gives me a male hose connection on my header. Since the water source is coming from the male end of a hose, only by inserting the female-on-both-ends filter, will the system work. That’s my design to try to make it foolproof, so the filter will always be in place when the water is flowing. When using high pressure water, the same is necessary to avoid bursting your tape, to assure that the water passes through the pressure reducer/filter first.
You’ll need to close the other end of the header; I use the same plastic hose threaded nipples, and a regular hose end cap, available at any hardware store. This allows me to flush the header by removing the end cap, before I pressurize the tape. This is especially important to do at the beginning of the season. Both ends of the headers have caps on them when not in use to keep out dirt, insects and rodents.
IF YOU HAVE MINIMAL WATER FLOW
To determine how much water you’ll need to water each row, use this formula: (½ gal per emitter per hour) times (emitters per foot—usually one) times (your row length in feet) equals (the gallons of water per hour you’ll need to water that row). If you can only do one or two rows at a time, then you can eliminate the headers. To do this, each row of drip tape can be connected to the filter with a short piece of feeder hose, made by inserting a barbed outlet fitting into the (cut off) end of a scrap piece of ½ inch garden hose. Depending upon brand of hose, you may need to wrap a bit of electrical tape around the barb for a tight fit, so the barb won’t pop out of the hose when the system is in use. The other end of the barbed fitting has the regular screw-tight fitting for inserting into end of the drip tape. Attach the other end of this hose to the filter and pressure up! At the filter’s outlet, you can add one or more hose Y’s to accommodate as many of these ½ inch feeder hoses as you have water for. Using Y’s with shut-offs on each branch, and having your feeder hoses different lengths allows you to selectively water several rows across the top of your garden. However, the header system described above involves far less maintenance.
AT THE END OF THE SEASON…
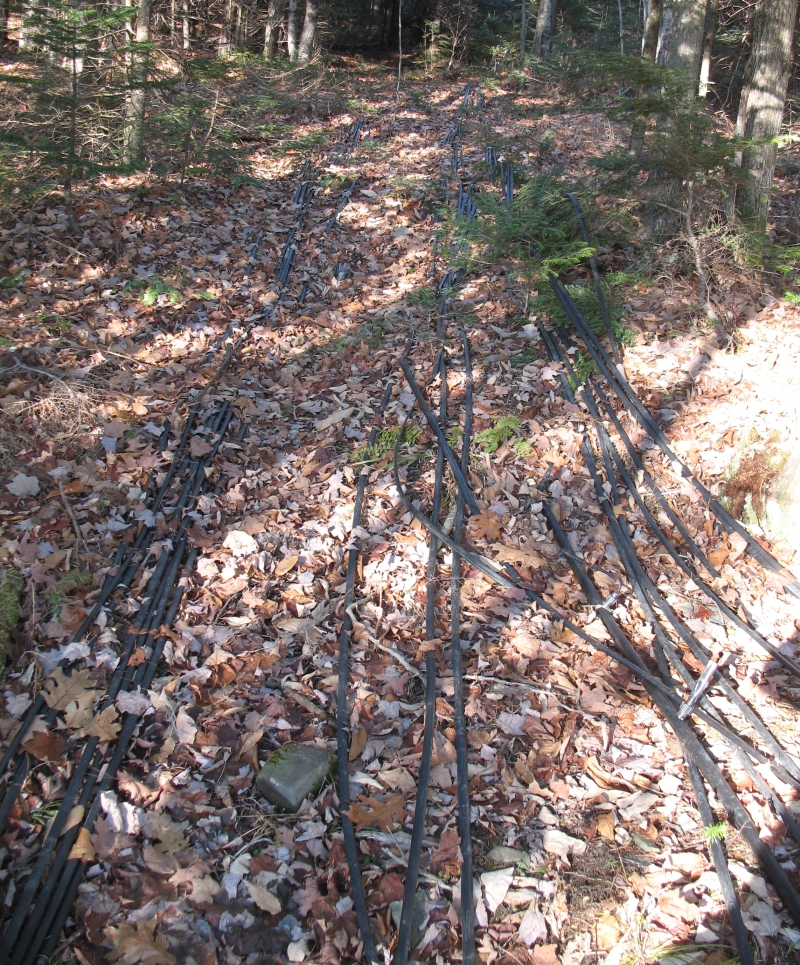 …everything gets pulled out of the crops and into the woods, perhaps along an unused woods road. Or to the edge of a field where you will remember to pull out the tape before mowing next year, won’t you? Different length rows? This length goes down this path; that length goes down that other path. …everything gets pulled out of the crops and into the woods, perhaps along an unused woods road. Or to the edge of a field where you will remember to pull out the tape before mowing next year, won’t you? Different length rows? This length goes down this path; that length goes down that other path.
Our first two years we rolled up tape using grape lugs for spools, but decided dragging it into the woods was far easier. Remember, it’s tape, not hose, and kinks like crazy (especially the cheap thin stuff), so keeping it in a line and not bunching it up makes handling it a lot easier. So as soon as you find yourself standing in one spot and pulling the tape toward you hand over hand and letting it bunch up behind you—STOP! Doing that will assuredly make kinks. Tape does not handle like hose, since when not under pressure it is flat. Pulling it along the ground when it is kinked is the surest way to abrade a hole into the corner of the kink.
When moving the tape into or out of the field (except when first laying out from the original spool) we use 5 gallon buckets of rocks as pivot points. They are round and heavy, mobile enough to re-position as needed, and allow us to pull the tape around corners without pulling it across a growing crop. When removing tape from the field, we position a rock bucket near the end of the row, pull the tape around the bucket and just walk to where we will be storing the tape. Sometimes and with certain crops (summer squash & cukes especially) we have to first walk the row and pull the tape free of the vines which have during the season grown on top of the tape weighting it down in dozens of places.
MISCELLANY
- Figuring conservatively, each piece of drip tape will last you three to five years, depending upon the care you take and how many mice find it pleasing to chew on. Once it no longer distributes water effectively, it’s time to find other uses for it.
- Dead (holey or clogged) drip tape makes excellent batten tape for holding greenhouse plastic in place. It’s much better than vinyl batten tape, doesn’t shatter when stapled below freezing, and seems to resist photo degrading for at least ten years.
- Use it instead of rope for securing roll-up greenhouse sides so they don’t blow up in the wind. It has out-lasted most of the ropes I have used for the same purpose.
- Feeding fish emulsion through drip tape is generally not a good idea, unless you flush the tape very well afterwards. I did it once; won’t do it again.
- Lay your tape over (not under) your mulch, and you can check if it’s working, locate any leaks, and pick it up easier in the fall.
- Lay your tape as soon as you plant your crop, or certainly after the first weeding, before the crop gets so big it’s in the way of laying the tape.
- Tape laid, but not used will tend to blow off until the crops are large enough to hold it in place. Floating row cover staples work well to hold the tape from blowing, placed about every fifty feet. Just don’t push the staple into the ground so far as to pinch the water flow in the tape.
- In dry seasons, we lay each tape right on top of the seeded row until the crop emerges.
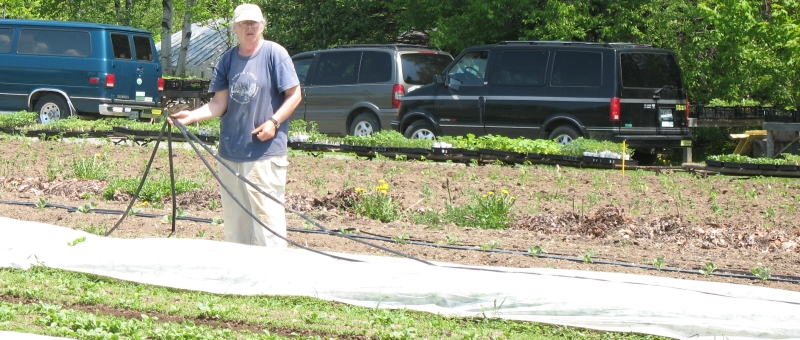 Lay it over floating row covers, and it works fine, although wind blowing the covers will knock the tape off the bed when the tape is empty. Lay it over floating row covers, and it works fine, although wind blowing the covers will knock the tape off the bed when the tape is empty.- Some folks bury the drip tape in rows under their crops, and say it works great. It gets laid and gets pulled up with a rig mounted on a three point hitch.
- Leaks in drip tape can either be heard as hisses (because they are pointing down) or seen as geysers (because they are pointing up). To effect a quick field repair when you aren’t carrying any splicing couplers with you, poke a small stick into the hole. That generally turns a geyser into just another drip. Unless of course the leak is from a long tear instead of a round hole; then you’ll need those splicing couplers.
- Always lay drip tape with holes facing up, not down. If there is any silt in the line, you don’t want it settling into your drip holes and clogging them.
- If you are running a very low pressure system, and your rows are running down hill, say, 10 feet lower at the bottom than at the top, you may find that the bottom of the rows are getting watered well, but the tops are getting practically nothing. More pressure or greater water flow (or not running your rows down hill!) will solve that problem. Or you could water the top half and bottom half independently. It makes no difference whether you are feeding the tape from the top or from the bottom of the row, except that if you are feeding from the bottom, all the water will run back out of the drip tape when you disconnect it.
- Some thoughts about dealing with low pressure water can be found here.
This is the second draft of this article. If anything isn’t clear please request clarification. The fuzziness of my brain at the end of a long day has been known to show up in my writing. -tr
|


![When feeding more than one tape, a header pipe is used. Each tape is plugged into the header pipe, then the header is presurized using a filter [and pressure reducer if watering with well pressure]. Hose caps are used to prevent dirt from getting into the headers when not in use. (Click to enlarge.)](/farm/wp-content/uploads/HeaderEnd_800.jpg)


